• The percentage of participation in construction?

    The percentage of participation in construction?

    Participating in the construction for several years has been well received by the owners of old and dilapidated properties. These agreements, if passed in the right voice and with respect to the rights of both parties, will bring satisfaction, because in recent years, especially in other large cities, few people may own land and capital and expertise to build a new building. Have at your disposal.
    There are many benefits to building a partnership:
    Improving the strength of the new building compared to the old building
    Observance of new and codified engineering principles for building construction
    Create more residential space
    The beauty of the building according to the tastes and standards of the day
    Use of modern materials, methods and machines to build buildings
    But perhaps the most important advantage of such a contract is the benefit that is agreed upon in the short term. For this reason, it is necessary to know the legal and customary cases regarding the calculation of the share of the owner and the builder, and to enter the operation of the participatory constructor more safely.

    On what principles is the share of the landowner and the builder (both parties to the contract) calculated?
    There are common principles for determining the share of each party to a contract, which we will discuss below. Of course, fluctuations in the housing market and price volatility cause many people to be skeptical when it comes to building a partnership. In any case, they normally base their price on the current situation.
    For example, in Tehran, the formula for calculating the participation in construction in each area is based on “the price per square meter of a newly built apartment in that area.”
    According to this principle, if the average price per square meter of a newly built apartment in the area where the construction is to be made is up to four million and five hundred thousand tomans, the profit sharing is usually done equally (50-50). Otherwise, if the average price per square meter of a newly built apartment in that area is between 4.5 million and 5.5 million tomans, the profit rate will change and the share of the landowner will be 55% and the constructive share will be 45%.
    Of course, at the moment, and considering the price of housing, we are no longer witnessing prices below 5 million tomans per square meter for newly built apartments in lesser areas. In this case, in addition to determining the participation formula as 60-40%, an amount is also calculated as “gratuitous”. This amount is paid to the owner by the builder at the beginning of the partnership process so that he can live in another house during the construction and preparation of the new building.

    On what basis is the amount of “gratuitous” calculated?
    The amount of “gratuitous” is usually determined by agreement and there is no specific law about it. But the custom for it is as follows: determining the amount of one million tomans per square meter of the area of ​​the old house in an area where the price per square meter of a newly built apartment is more than six million and five hundred thousand tomans.
    In other areas where the price per square meter of a newly built apartment is less than this amount, the amount of “gratuitous” varies and is determined by agreement of the parties.

    Is there any other formula for calculating the free participation in construction besides the market custom?

    Yes. You can use the following mathematical formula to calculate the share of participation:

    R = A% × D – G% × M
    Total value of property = M
    The value of the constructor = G
    Total construction cost = D
    The share of the owner = A
    Rate amount = R

    Example:
    A property worth two and a half billion tomans, the construction cost of which is estimated at one billion and one hundred million tomans, and the ratio of the manufacturer’s and owner’s share is 40% and 60%, respectively.

    2,500,000,000 × 40% – 1,100,000,000 × 60% = 340,000,000

    As you can see, the amount equivalent to three hundred and forty million tomans must be paid by the manufacturer for the difference and paid to the owner free of charge.
    In simpler terms, we can say that the owner sells a part of his property to the builder, and the builder pays the owner’s share instead of the transaction amount, and the difference is paid in cash.

    Here are some tips to help you get started:
    If the amount of gratuitous money is negative, the owner’s share should be less.
    Manufacturer’s credibility can also have an impact on gratuitous calculation in participation in construction, because reputable and well-known manufacturers usually pay less for gratuitous.

    What are the other points regarding the calculation of the owner’s and constructor’s share in the construction participation contract?
    It is best to have all stages of property or land valuation done by qualified and official experts.
    Given the sharp fluctuations in housing prices, it is possible that at any time an agreement will be reached on the mutual value of the parties with changes to what was stated in this article.
    Before signing and signing the contract, try to read all its provisions and clauses and understand them clearly.

    Conclusion:
    In recent years, with limited financial resources, construction partnerships have been well received.
    Determining the owner’s and builder’s share of the project is usually agreed upon and there is no law for it. In any case, most people try to follow the custom and what is common in this field.
    Currently, the calculation of the percentage of participation in the construction is done according to the price of each square meter of a newly built apartment in that area.
    Free money is the cost that the developer pays the owner at the beginning of the project so that he can provide accommodation for himself and his family until the end of the construction operation.

    05/07/2020 By smart dg land news arch
  • Advantages of Cubiax Ceiling

    Advantages of Cubiax Ceiling

    With the theory that you can limit the legal time of an earthquake, we can provide it to you with your support, you can provide it to others by attending. Heavy and integrated roofs in the sudden earthquake distribution list mix messaging and architectural installations and architectural spaces. As a useful use of power materials and lightening the roof of the structure is possible more quickly. Using the suggested methods, engineers and architects are allowed to build light ceilings to enhance your safety. From a variety of light ceilings, access to the Cubiax roof can be relocated. This type of roof is one of the newest examples of light roofs that is used in construction and installation of special places.

    Cubiax roof
    Cobiax Ceiling, a kind of cyberspace dawn that can be provided to you in space, you can use your news space. Cubiax roof modules in two types of flat and spherical ball for design and cleaning can be provided using polyethylene or advertising programs and providing friendly and friendly services. Throat ball, a narrow line in a narrow slab that is less thick to access the mission and upgrade between 10 to 22 translator friends. Spherical sphere, environmentally friendly line in the sign of possibility with higher thickness using its power and strength between 2 to 4 to 45 minutes translator. These types of spheres have validity in wide concrete openings and can easily carry the load equal to the slab. Cubiax balls are allowed to sell a thousand of the game’s permissions, and it is permissible to facilitate the above reinforcement as well as to access these items.

    The Brazilian Cobix Ceiling Law is a two-sided concrete slab roof that can be selected with a non-structural dead load and a two-axis load bearing. By forming a high-strength concrete light at the top and bottom, or by having a slab and forming a force in its guests in two directions, it allows you to give you the balls in the middle of the concrete slab. .

    Cubiax roof components
    Shelf module (empty plastic balls and steel truss)
    Reinforced concrete slab
    Betonol on the roof of the Cubiax
    Concrete with a Cubiax roof can be used to make ordinary concrete. This type of roof is done in two steps. The spherical shape of the Cubiax balls is possible and you can vibrate as much as you can to use your visa. Cubiax roof modules are possible.

    Advantages of Cubiax roof
    Concrete is used for motherboard concrete and steel, and you can ask that it be cost-effective using articles.
    This type of roof has an additional load that can be provided to you and monitored during the earthquake and uses it to reduce this.
    Cobiax anti-scratch and high-permeability bullets and a kind of thermal habit may be able to help you in these situations and allow you to use discounts and advice.
    The Cubiax roof government is at your disposal with other conventional roofs in a limited time, with Terry.
    Using this type of management system
    Cubiax Ceiling A kind of perfume, you can decide through the server and louder sound.
    These roofs have high bending, shear and stiffness.

  • Pros of using beamed roofs and blocks

    Pros of using beamed roofs and blocks

    Among all the roofs of the building, block joist roof is the most widely used type of roof. In block roof beam system, the beams act as a side beam and the block is the filling agent between the beams. In the roof of the block beams, lightweight concrete, clay or polystyrene foam hollow blocks are used to fill the empty space between the beams. Beam and block roofs are one-sided slabs that use hollow blocks to reduce dead load on the building. In this type of roof, beams are used in two types of concrete or steel and the distance between them is about 50 cm. In general, in the construction of beams, practical calculations should be made based on the customer’s order.
    Beam and block roofs are made using beams and blocks that are prefabricated in the factory and are executed by concrete concreting stage. After placing the beams at certain distances and piling under the beams, the blocks are arranged between the two beams. Then the thermal reinforcements are installed and concreting operations are performed.
    Beam and block roof components include the following:
    • Beams
    • Block
    • Negative armatures and heat and drop armatures
    • Middle coil
    • Concrete cover in place
    Beam block roofs are used in a variety of buildings, including brick buildings, metal and concrete structures, and have the following benefits and advantages:
    Advantages of joist beam and block roofs
    • Execution of block joist roof does not require specialized labor or special equipment and can be done by ordinary building workers.
    • Candlelighting during roofing makes these types of roofs have less vibration than other roofs.
    • Forming under ceilings is done only by piling and installing four lathes at certain distances, and there is no need for specialized people who formulate and reinforce reinforced concrete roofs.
    • Installation of block joist roof is done quickly and easily due to prefabricated beams and blocks.
    • Implementation of this ceiling does not require time-consuming workshop and costly work.
    • Beams and blocks are produced in industrial factories under the supervision of quality control, and less manpower is required to do so.
    • The use of hollow blocks reduces the consumption of concrete, which saves money and is economically viable.
    • These roofs are highly resistant to horizontal forces such as wind and earthquake.
    • The beams of the blocks are light weight and their transportation does not require the use of cranes because they can be transported to the floors by the workers.
    • Stretch concrete in beam and block roofs are replaced by blocks, which is why these types of roofs are economical.
    • With the implementation of beam and block roofs, it is possible to run several roofs simultaneously and there is no need to use sub-roof jacks.
    • The use of this type of roof reduces the consumption of plaster and soil and creates more uniformity under the roof.
    • Block joist roofs are a kind of sound, heat and moisture insulation.
    • The strength and durability of block joist roofs against fire is very high.
    Concrete beams
    Concrete beams are prefabricated elements made of concrete and steel reinforcement. In their structure, the blocks are placed between the beams and covered with concrete. According to the production method, concrete beams fall into two categories: truss and prestressed.
    Concrete beam prices
    The price of concrete beams varies depending on its length and height. For information on the latest prices of concrete beams, refer to the following link.
    Concrete heel beam
    The concrete part of the truss is called the concrete heel. This part is where the concrete is placed and acts as a cover and restraint for the lower truss rebars. Concrete heel beams are very important in the execution of the roof, and if there is a problem in its structure, the placement of the blocks will be difficult.
    Chromite beams (metal beams)
    The chromite beam, also known as the metal beam, consists of a belt or sheet and two wings at the top and bottom. One of the advantages of using chromite beams is to increase the speed of roof execution. Generally, the weight of these beams should not exceed 10 kg with residential loading and the use of 5 to 6 meter beams.
    Chromite beam prices
    One of the factors influencing the price of chromite beams is its length.
    Industrial beams
    What is an industrial beam? Industrial or machine beams consist of a floral truss whose cutting rebars are connected to the lower and upper reinforcements using a welding point. One of the effective factors in the price of industrial beams is its length and dimensions.

    04/17/2020 By smart dg land news arch
  • Stages and the process of building a home pool

    Stages and the process of building a home pool

    Swimming and body water are one of the most popular sports and entertainment for all ages. But the hustle and bustle of public swimming pools may keep many people away from this fun activity. A home pool can solve this problem and provide you with fun moments at home with your family.
    Do you have an empty space in your backyard or have you just bought a villa and plan to build a pool in that yard? Has the idea of ​​having a home pool ever crossed your mind? In this article, we will tell you what you need in terms of designing and building a villa pool.
    You can have your own home pool depending on the environment and the desired area. In addition, we will provide a cost estimate for each model so that you can make a decision based on the budget you have and make the best choice.

    Types of pools
    Pools are divided into two general categories, indoor and outdoor, in terms of location in the building. The first group is located inside houses or in private environments such as a room in the corner of the garden and villa, which is less popular due to its higher cost.
    The second category is outdoor pools, which are usually built in the garden and yard of villa houses, building terraces or even the roof, and in this article we will focus more on this type.

    Preparing to build a home pool
    Before starting work, you must specify exactly all the steps and details. In fact, you need to determine how you want to build your pool, for example, cement, ceramic or prefabricated. Your budget is very important in building a home pool. First of all, determine exactly how much you want to spend on it.
    By reading this article, you can be aware of the estimated cost of construction and determine your budget based on it, and then make your final decision. Keep in mind that in addition to the initial cost of building a home pool, you must set aside an annual amount to maintain the pool, as well as the cost of water and electricity.
    In the next step, you need to determine the exact space that you can allocate to this task and calculate the dimensions of the pool. It is best to allocate space for a pool that has good sun exposure. In order to reduce the cost of heating water, it is wise to consider a place that absorbs the most sunlight. It should be noted that around the location of the villa pool, there are no trees with many roots.
    The reason for this is that with the gradual growth of these roots in the soil under or around the pool, it damages the mechanism of the pool and the piping system and drains the water. Also, if a tree is near the home pool, while creating shade and reducing its illumination, by spilling the leaves and gum, it will contaminate the water and settle on the bottom of the pool. Therefore, the hassle of cleaning and maintenance costs increases.

    Now put the design you want on paper. Draw what you have in mind with simple lines. Your design doesn’t have to be professional. You just have to be more discriminating with the help you render toward other people.

    Carefully note all the essentials of home pool design, including the square or rectangular shape of the pool, the number of steps, the shallow and deep sections, the vegetation around the pool, and so on. Of course, you can hire an interior designer for a little more money, and with its help, you can design your villa pool very accurately and professionally.
    Now it’s time to move on to a trusted contractor. Choosing a contractor is very important because you entrust him with the task of constructing a home pool, from obtaining the necessary municipal licenses, to drawing and implementing a plan. After making the preparations, show the contractor your original design and tell him everything you expect to be built in your villa yard.
    Together with a team of technical experts, he will guide you on how much of your plan will be feasible and how much it will cost to build. Technical experts then inspect the location of the villa pool and map it out. Finally, the designers will prepare an expert map of the home pool with detailed executive details, including the amount of excavation, the material of the floor and the wall of the pool, the depth and thickness of the wall.

    Infrastructure needed to build a home pool
    After a thorough inspection of the construction site of the villa pool, drawing and obtaining permits, according to the depth and dimensions of the outdoor pool, the desired area will be excavated with the help of drilling machines. After that, the bottom of the pool is smoothed and to create shallow and deep parts of the pool, it is tilted and then poured. The next step is to reinforce the bottom of the pool with rebar, which is placed in a grid on the floor and wall of the pool.
    Now it’s time to relocate the pool facilities. According to the executive plan of the home pool, the piping works the water inlet and outlet pipes and the electrician performs the wiring for the pool lighting system. If you plan to use hot water in the pool, it is necessary to consider a space as a motor house in the construction plan of the pool so that the equipment related to the pool such as pump, water purification filter, water temperature setting, etc. can be placed in this place. It should be noted that the engine room level is about one meter lower than the pool floor level.
    After the pool infrastructure works, concreting is done. You can also use concrete blocks to build a pool floor, which is easier and more affordable for a home pool that won’t hold a lot of water. After placing the blocks on the bottom of the pool by pouring psychological mortar on it, they cover all the holes between the blocks.
    After building the floor, it’s time for the pool walls. You can also fill the wall of the villa pool by concreting or picking up concrete blocks.

    Stages and the process of building a home pool

    Home pool sealing
    Once the pool floor and wall are completely dry, it’s time to insulate it. Combining white cement, concrete adhesive and stone powder, they make a mortar that insulates the pool. The mortar is applied twice to the entire floor and walls of the pool, and then tested to see if water leaks from the pool. This test is such that the inside of the pool is completely filled with water, after a few days the water level is measured.
    If the pool surface is significantly lower or the outer walls of the pool are damp, it is a sign of water leakage and the sealing work must be repeated. Insulation can also be done using insulating sheets such as geotextiles or geocomposites.
    After complete sealing of the home pool, it should be filled behind the walls of the pool. This is done with building materials such as limestone. After that, it’s time to tile the villa pool. After tiling, it is possible to make the space around the home pool and make it more beautiful according to the initial design of the pool.

    The final stage of building a home pool
    After finishing the tiles and beautifying the surroundings of the villa pool, we fill it with water and turn on the pumps and the heating and lighting system. After examining all the cases and the lack of defects, the pool can be used. It is best to do this for the first time in the presence of a specialist.

    Estimate the cost of building a home pool
    Estimating the cost of construction depends on several factors. After accurately determining the dimensions of the outdoor pool, examining the land area and the type of soil, designing, mapping and determining the materials and tools that are needed, the contractor can estimate the cost of construction. It is the beginning of spring 1997.
    To estimate the cost of building your pool, you need to consider the current market conditions and the current price of materials. As an example, below are the approximate costs of building a home pool with an area of ​​40 square meters (10 meters long, 4 meters wide and 2 meters high).

    Estimation of the cost of building a home pool with an area of ​​40 square meters and a height of 2 meters:
    80,000 manual excavation and 20,000 Tomans per cubic meter
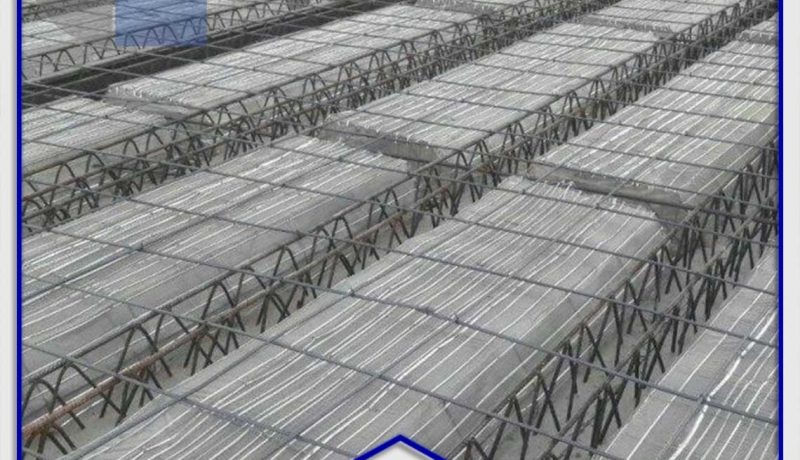
    180 thousand tomans per cubic meter of concrete (about 20 cubic meters of concrete is needed for a villa pool with such dimensions.)
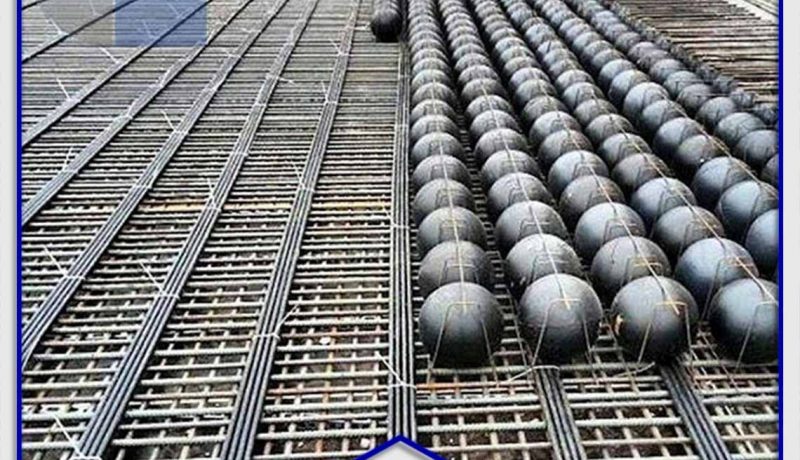
    For every square meter of this pool, at least 20 kilos of rebar 14 are needed, each of which costs 5 thousand tomans.
    Concrete reinforcement of the pool is 45,000 Tomans per square meter (the walls and floor are about 100 meters).
    Household pool cementing is 20,000 Tomans per square meter
    Insulation 20 thousand tomans per square meter (about 100 meters of insulation is needed.)
    Each square meter of ceramic is approximately 65 to 120 thousand tomans and its installation cost is 40 to 60 thousand tomans per square meter.
    Costs related to plumbing, electrical wiring, engine room equipment, lighting system, villa pool stairs, etc.
    Wages of contractors, experts and workers
    According to these prices, the cost of building a villa pool is about 500 to 600 thousand tomans per square meter. This is in addition to the costs of conventional maintenance, use, facilities and engine room.

    Different models of home pool
    The home pool has different models, and these different models go back more to their appearance. Choosing a pool model that fits your home environment can increase the beauty of your home many times over. Here are some home pool models. However, keep in mind that you are not limited to this list to choose the pool model. In fact, you can build your dream pool according to your budget, materials on the market, and the level of expertise of the contractor, whatever you want.
    Rectangular pool
    Most people prefer to choose a simple and classic rectangular shape to make the most of their available space. Also, this simple choice does not increase construction costs. In addition, the rectangular pool is more suitable for swimming. All in all, a rectangular pool is the best choice when you have limited space. You can use the furniture around this type of pool to make it look more attractive.
    Circular pool
    Curved, semicircular, or oval-shaped pools are always attractive options to choose from. This type of pool has a different look from the traditional and classic mode, which can be eye-catching depending on the space you have. You can use low plants and shrubs to decorate the space around this type of pool.

    Built-in pool
    This option is best for coastal homes that have the least space to have a pool in their home environment. These models of pools, which are often prefabricated, are installed inside the prepared space.
    Pool on the ground
    A model of a pool that usually has wooden or stone edges and sides, and instead of being placed inside the ground, it is placed on the ground like a large tub. In this type, the sides of the pool continue at several different levels to increase the usable depth. These sides can be used as a bench and give a beautiful atmosphere by placing pillows around it.
    Other types of pool can include spiral designs, stone facades, glass and even pools with your favorite designs. With a simple search, you can see a variety of photos of pools and get ideas for your choice.

    Conclusion
    Here’s a look at some of the things you can do to help build and maintain a pool, so you can make an informed choice. We first looked at the types of pools. In the pre-construction section, we explained that you should first consider your budget.
    Then determine your pool model according to the space you want to allocate. Finally, share your ideas with a Carballo contractor so you can have the pool you want in your home and enjoy it to the fullest.
    Here are some suggestions on how to look or get an appointment for antique items in your home pool to help you get the most out of your budget. Finally, we took a look at the different models of home pools. Remember that you are not limited to these models, and with a little creativity and budget and space, you can build your dream pool.
    To have a different and special pool, you can go beyond the cliché of angular shapes. A pool with curved corners can give your home a beautiful look.
    You can make your pool more attractive by choosing the exterior and the different colors of the tiles.
    You can use glass to have a more private home pool. Use frosted or clear glass to shape the space the way you want it.
    If you have children or are in contact with children, don’t forget to design their home pools. You can give them a platform or a slide and sweeten their sweet world.
    By combining the waterfall with the pool, you can experience the pleasant, soothing and soothing sound of the waterfall in your home space.

    04/12/2020 By smart dg land news arch
1 3 4 5 6 7 8 9 36
Archives
Previous Next
Close
Test Caption
Test Description goes like this